Prior to moving to Garuda Linux I had been a long time user of MX Linux Xfce. On the plus side it had some excellent tools, but on the negative side it looked like a relic from another era. When I moved to Garuda Linux I decided to try the Gnome version because it was noted for its stability, and I found this was indeed the case.
The problem I had with it was its bloat - I was using it on an 8GB laptop and it became clear that sometimes this wasn’t enough. In the end I caused a terminal system problem by trying to debloat the system, so I decided to bite the bullet, reformat the drive and use the much more lightweight Xfce version of Garuda Linux.
I was pleasantly surprised by its appearance, and it used a fraction of the RAM used by Gnome, thus making many operations more speedy.
Anyway, I decided to see if I could add to what the Garuda devs had provided, so I set about researching what could be done with Xfce on a low RAM laptop. The following is the result of my research. If you’re using Xfce you might hopefully find some of the findings useful.
Here’s a short video showing some of the things that can be done with Xfce by utilizing this guide:

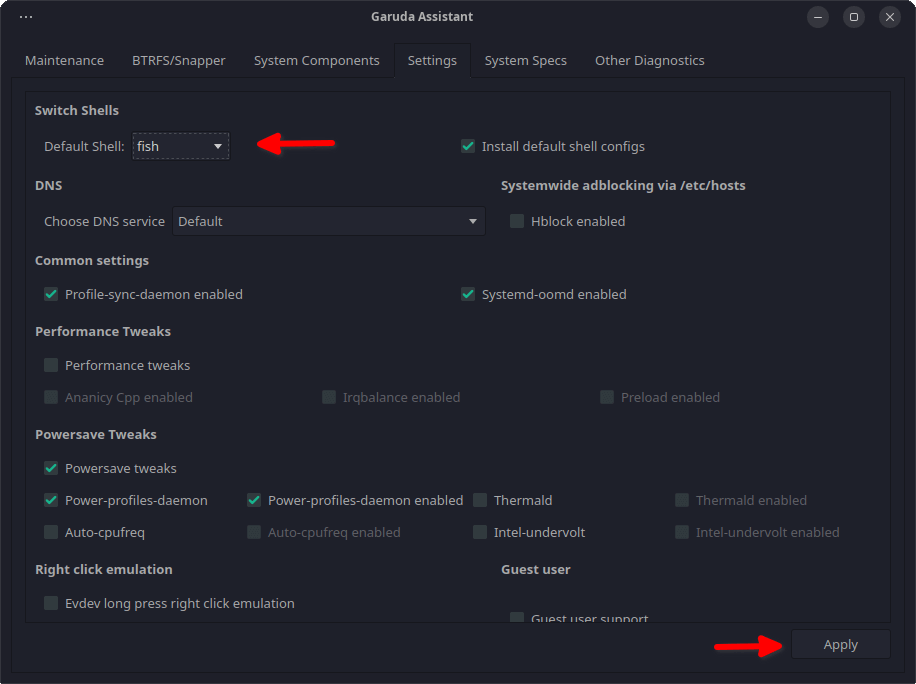
OK, let us begin. First up I opened Garuda Assistant > Settings and applied the Powersave Tweaks since I’m using a laptop:
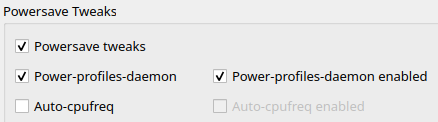
The UPower Power-Profiles-Daemon can also help to prolong battery life. A guide to enabling it is documented at How to manage power profiles over D-Bus with power-profiles-daemon on Linux - recommended for experienced users only.
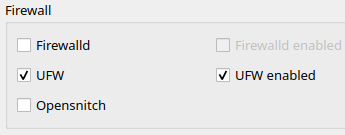
Whilst I was using the Garuda Assistant I also turned on the Uncomplicated Firewall in the System Components section:
Chris Titus did an article about securing web servers and he gives some suggested settings for UFW. …
sudo ufw limit 22/tcp
sudo ufw allow 80/tcp
sudo ufw allow 443/tcp
sudo ufw enable
Verify
sudo ufw status
Do Global blocks
sudo ufw default deny incoming
sudo ufw default allow outgoing
…I have used these settings without issues, but I only browse the web and little else. GUFW is the graphical version of the firewall and is installed using the command sudo pacman -S gufw. Here’s a screenshot…

…if you have any problems with the rules simply delete them, and the firewall can be turned off if absolutely necessary.
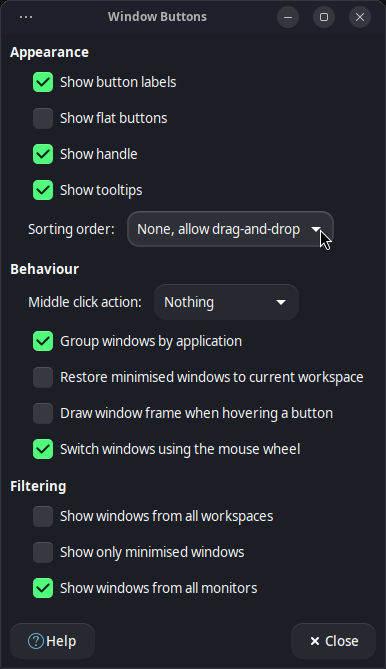
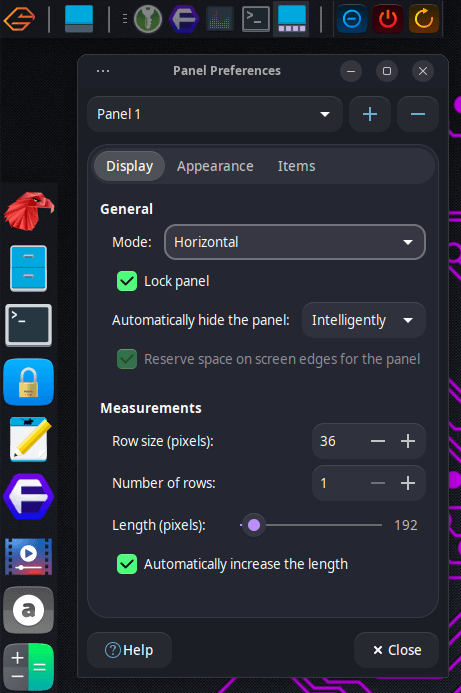
Xfce has a really useful feature for dragging and dropping Window Buttons, but it’s in a really obscure place. Once set you can move buttons on the Places Bar (taskbar).
Take a look at the image below. Right click on the handle which the mouse pointer is pointing at…

…and select Properties in the pop up menu that appears. When you’ve done this select None, drag and drop in the sorting order…
…places bar (taskbar) buttons can now be dragged and dropped into an order of your liking ![]()
Another obscure setting gives the places bar items a consistent look…
![]()
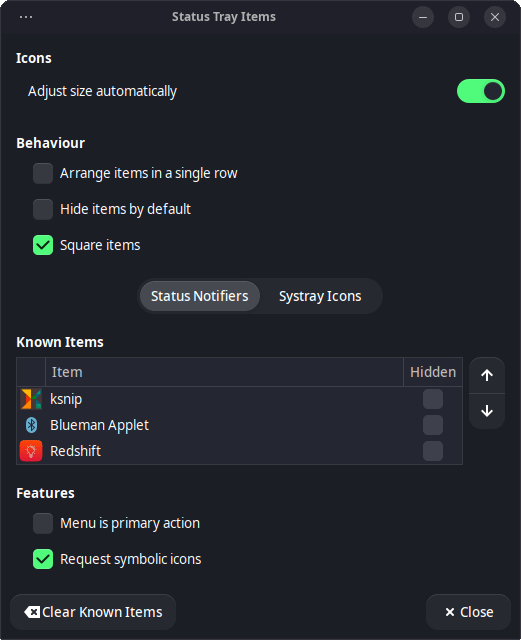
Go into the Settings Manager, select Panel, select the Items tab, and then double click Status Tray Plugin…
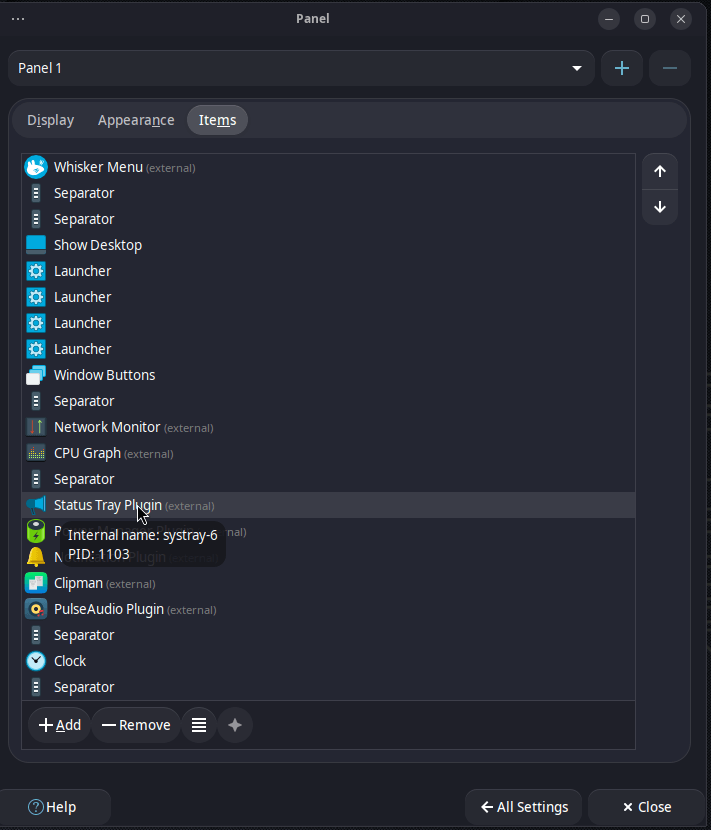
…this opens System Tray Items. Select the settings shown below in green to get the required look…
Xfce comes with a decent screenshot tool, but I have found I prefer Ksnip because of its functionality. Details are in the following video:

It is installed by entering the terminal command sudo pacman -S ksnip
Since we’re on the subject of screenshots GPU Screen Recorder is a really useful screen recorder which requires minimal CPU to do its job, thus making it really useful when live streaming games. More details:

It is installed by entering the terminal command sudo pacman -S gpu-screen-recorder-gtk-git
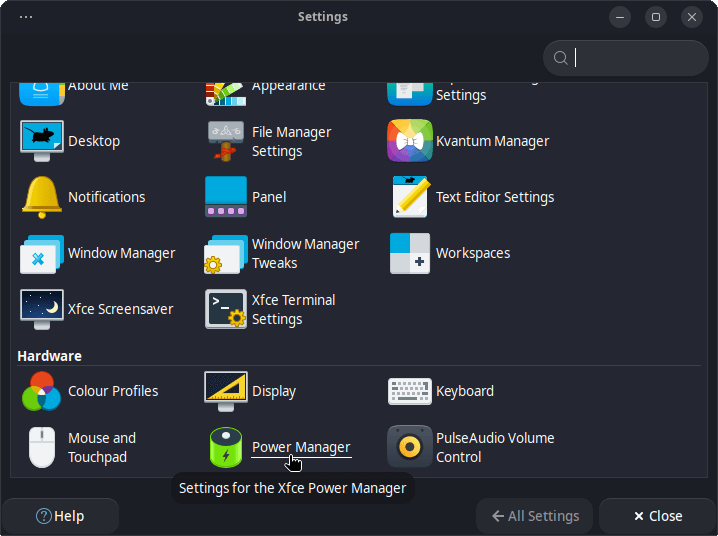
If you are using a laptop it is recommended you don’t fully charge and discharge your battery as this will shorten its lifespan. If you go into Settings > Power Manager…
…then go into System and increase the Critical battery power level. I set it to 30% and set On critical battery power to Ask. …
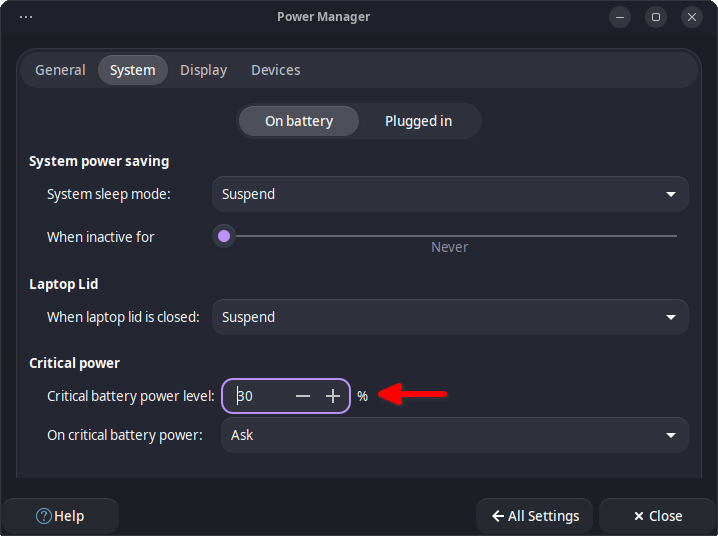
…this pops up s notice when my battery level gets down to 30%, and I then plug the laptop in and charge it to approx 80%. This reduces battery wear and gives me 4hrs+ of working time before another charge is needed.
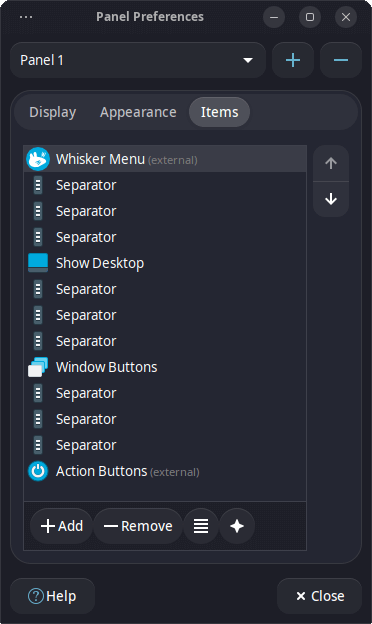
Many other applications can be added to the Panel and System Tray Items via Add New Items…
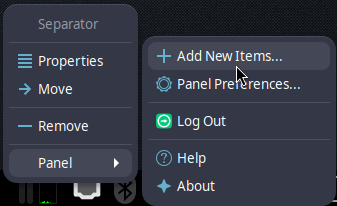
…some are really useful, some are functional, and one is plain silly - ![]()
Also, with regard to the System Tray Items, the Notifications bell icon takes up quite a bit of space. If you want this to appear only when necessary select Properties…
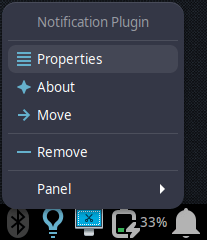
…and select Hide panel when no unread notifications…
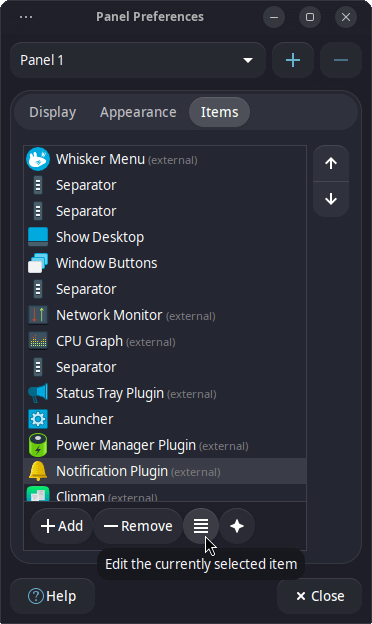
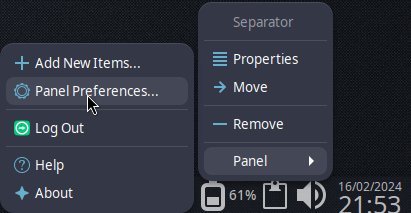
If you want to undo this action and return the bell to the System Tray Items right-click on the places bar and select Panel Preferences…
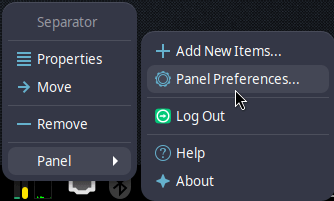
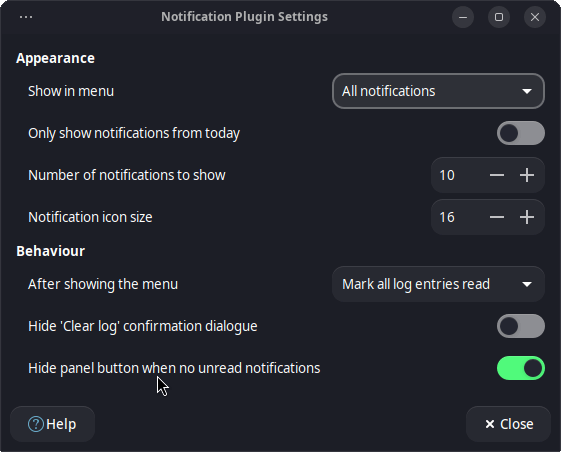
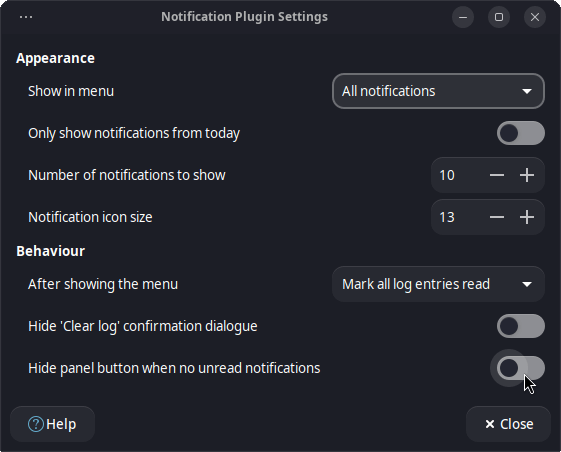
…click Notification Plugin then select Edit the currently selected item…
…and then turn off Hide panel when no unread notifications…
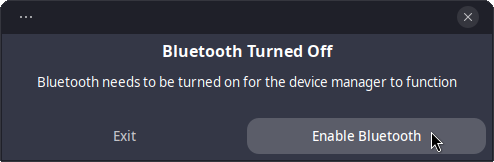
By default Bluetooth is enabled…

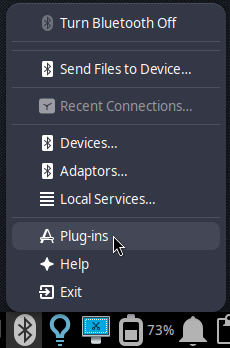
…to have it disabled at startup right click on the icon and select Plug-ins…
…select PowerManager and click Configuration…
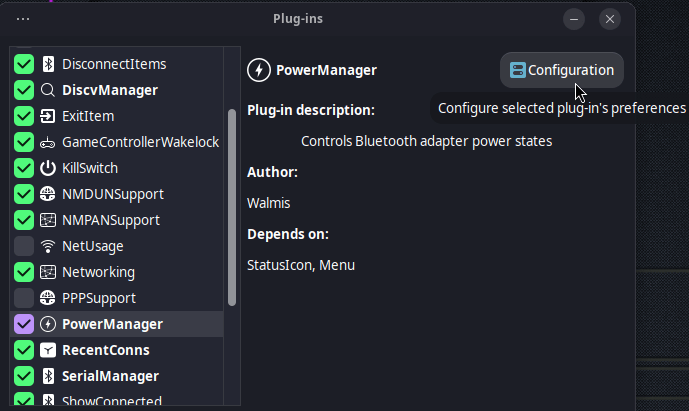
…then uncheck Auto power-on…
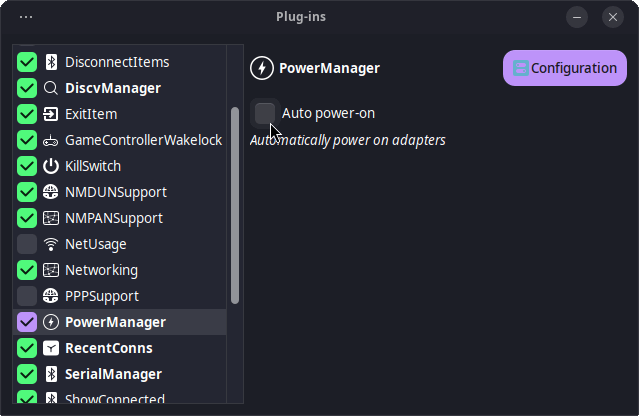
…this prevents Bluetooth from running at startup. To enable Bluetooth simply click on the icon and enable it…
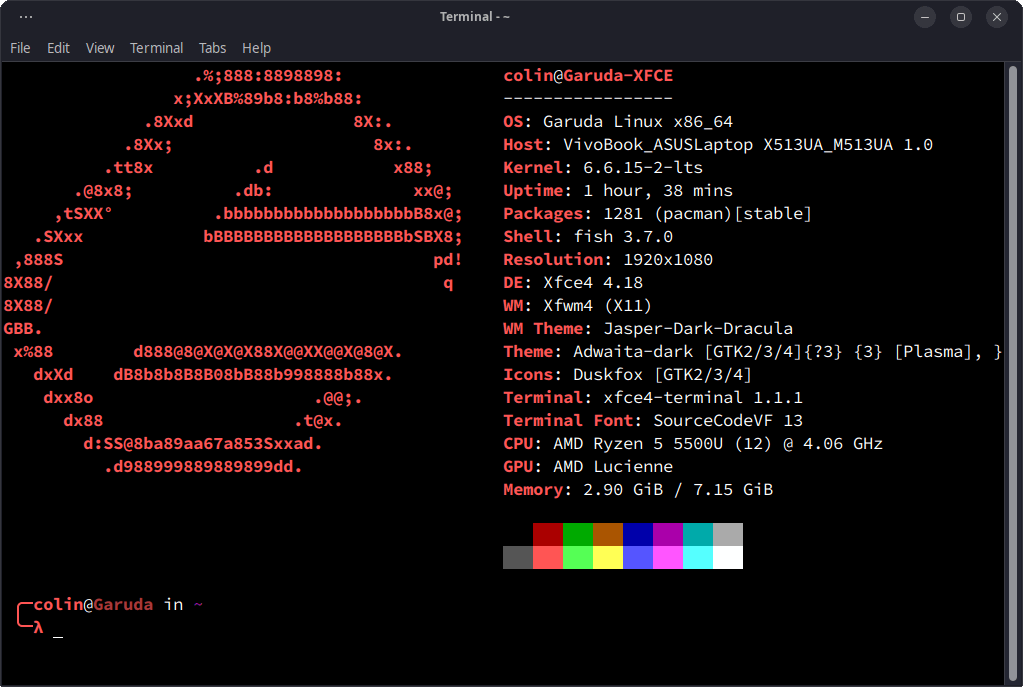
By default the Xfce terminal does not display Fastfetch (a fast version of Neofetch)…
…if you want to get it working you first need to check if garuda-fish-config is installed. This is done by entering pacman -Qs garuda-fish-config in the terminal…
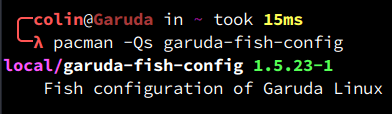
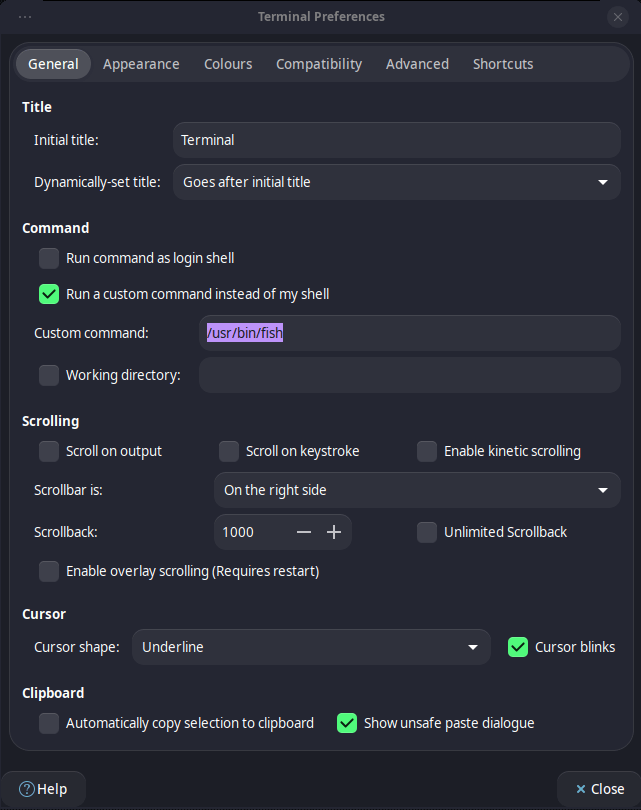
…the above shows it is installed on my laptop. If it isn’t installed on your machine you can install it by entering sudo pacman -S garuda-fish-config in the terminal. When fish is installed open up the Garuda Assistant, select Settings, then select fish as the Default Shell and Apply:
Then enter the terminal command mkdir -p ~/.config/fish and press Enter - this will create the fish config directory if it doesn’t already exist. Finally, enter sudo cp /etc/skel/.config/fish/config.fish ~/.config/fish/config.fish in the terminal to copy the required data into the fish config directory.
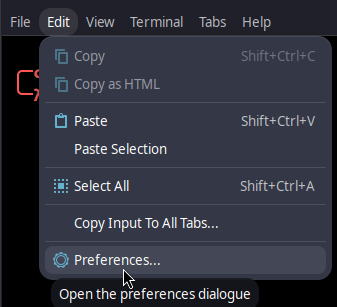
Next go in to the Terminal Preferences…
…and in General check Run a custom command instead of my shell, then set the Custom command to /usr/bin/fish…
…then in Appearance set the Default geometry to 100 columns & 27 rows…
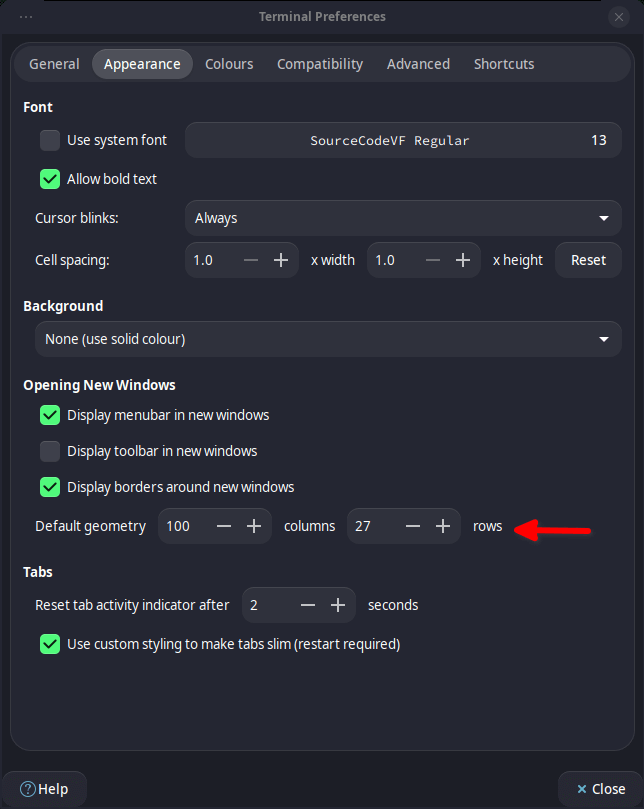
…and the end result should look something like this:
If you want terminal transparency select Edit > Appearance, then Transparent Background and Opacity [don’t reduce opacity too much] …

…and if you want your teminal colours to use the system theme select Colours and apply the following setting:

The end result of the above terminal settings:

As a suggestion for a terminal app, Btop is a super lightweight system monitor that looks good, dishes out a lot of info and kills processes if required. To install it via the terminal simply enter sudo pacman -S btop, and when it’s installed simply enter btop to start it. Full details of the app are here.
By default the Thunar File Manager displays the Go to the home folder in its toolbar…
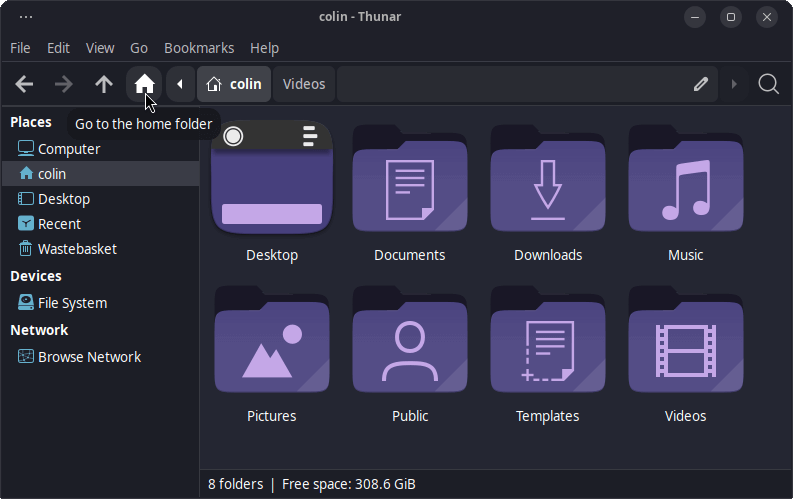
…I personally find this all but useless, so I change it to the much more useful Split View. To do this rught-click on the Toolbar and then select Configure Toolbar…

When that’s done uncheck Home and check Split View…
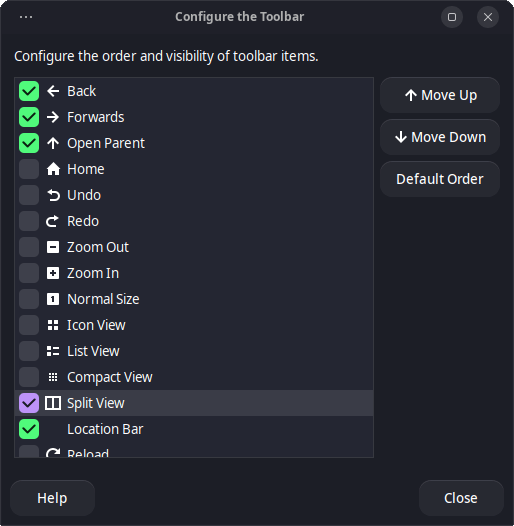

You now have a more useful Toolbar ![]()
The icons on the side panel are initially small. This can be changed by selecting Edit > Preferences > Side Pane, then increase the Shortcuts Pane Icon Size:

32px icons displays the following Side Pane:

Next up theming.
I always use a dark theme, but I found that Xfce does not respect theming for Gnome and KDE software, thus making things look like a dogs dinner when these are used.
After a lot of digging around I found solutions to these issues.
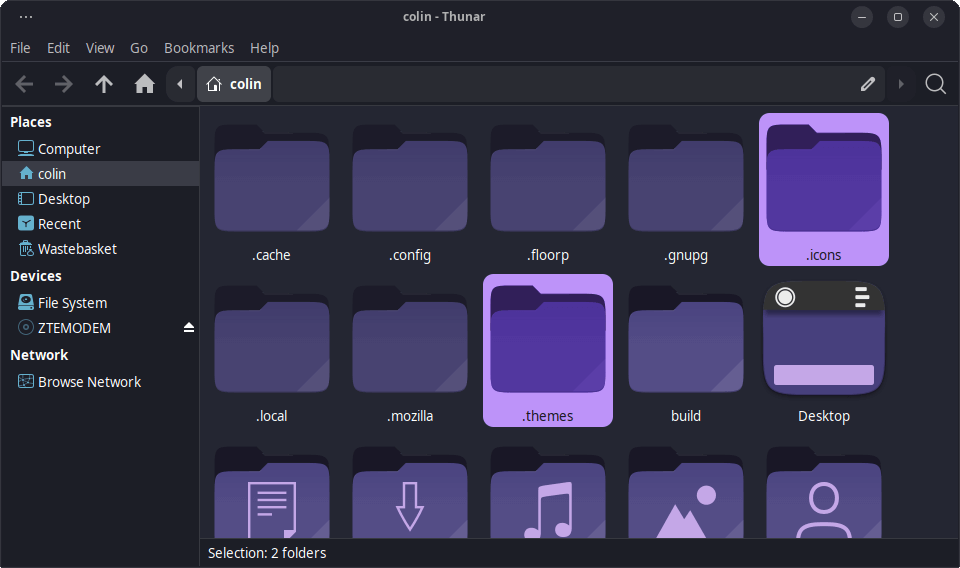
For this to work you’ll need .themes & .icons folders are in your home directory. To do this simply enter the terminal command mkdir -p ~/.icons ~/.themes. This creates the aforementioned folders if they don’t already exist.
If you want to check they have been created navigate to your home folder…

…select Show Hidden Files…
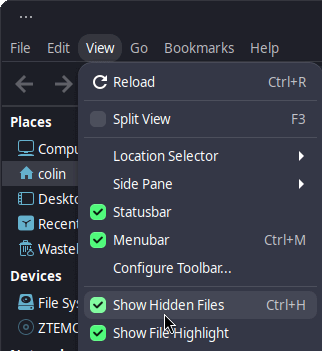
…and look for folders titled .themes & .icons…
The following will be placed into these folders.
First you’ll need a good dark theme, I used Jasper Dark Dracula from…
…along with Nightfox Dusk Icon theme…
When the files have been downloaded extract them from the compressed files. Next, open the Jasper Dracula folder. In it you will find the Jasper Dark Dracula folder - copy this into the .themes folder. Finally, copy the Duskfox folder into the the .icons folder.
Next, go into the Settings Manager via the Whisker Menu and then select Appearance.

In the Style tab select Jasper-Dark-Dracula, and in Icons select oomox-Duskfox, then go into Window Manager and in the Style tab select Jasper-Dark-Dracula (again).
Here’s what the theming looks like on the file manager:
I found the solution to getting Gnome software to use a dark theme here.
Edit the file environment in /etc as ROOT…
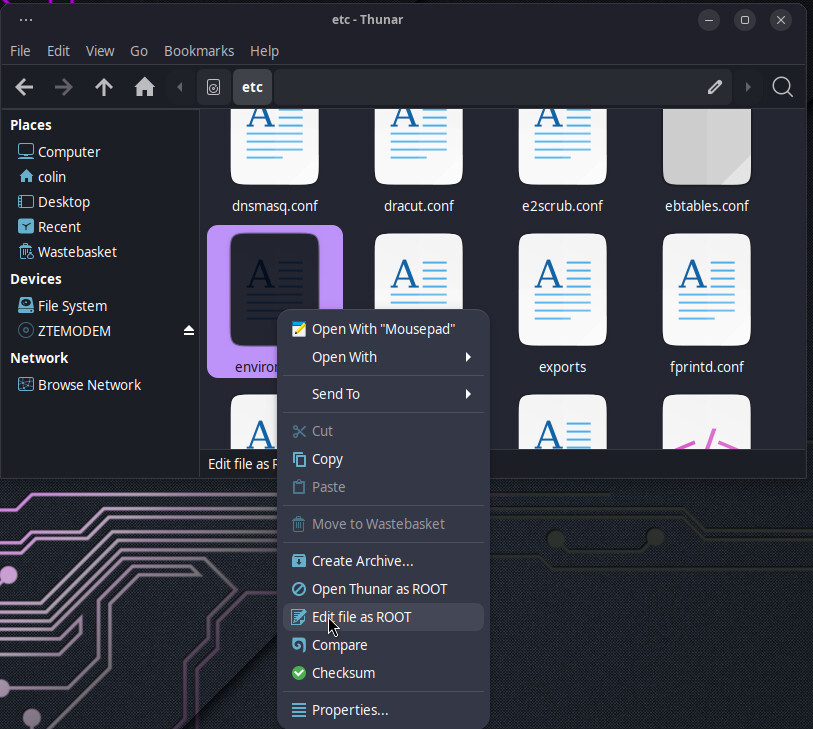
…and add this line to the end of the file:
GTK_THEME=Jasper-Dark-Dracula
Save the file and reboot.
To get a dark theme on KDE software I found two versions of Kvantum had to be downloaded. Open up the terminal and enter the following to download the required files:
sudo pacman -S kvantum
sudo pacman -S kvantum-qt5
Then download a dark theme, I chose…
…this is a good match for Jasper Dark Dracula. When it’s downloaded extract Dracula-purple.tar.xz, then click Select a Kvantum theme folder and select the extracted Dracula-purple folder, then click Install this theme…
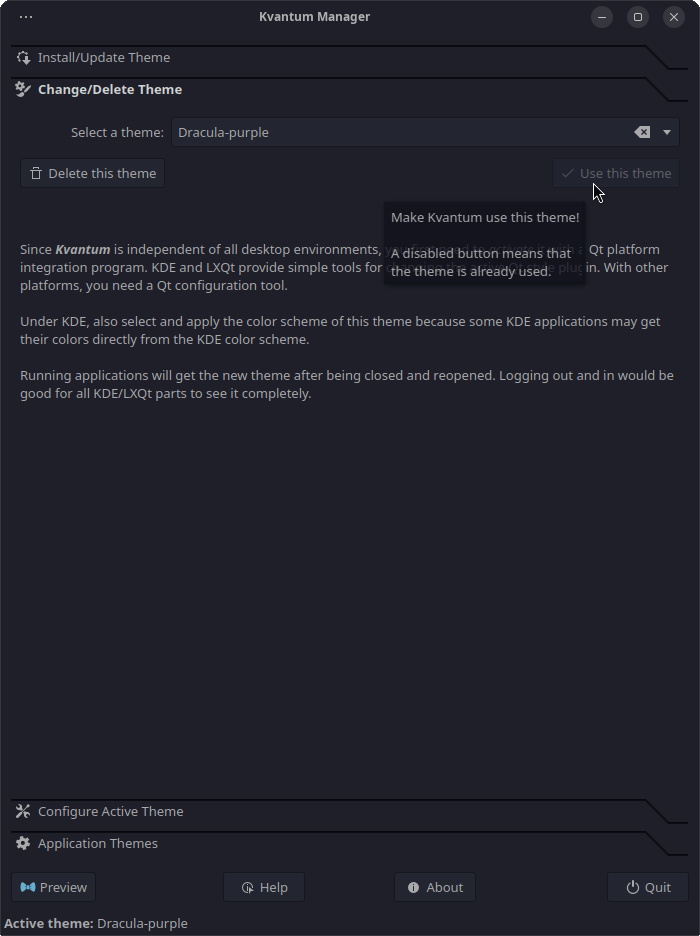
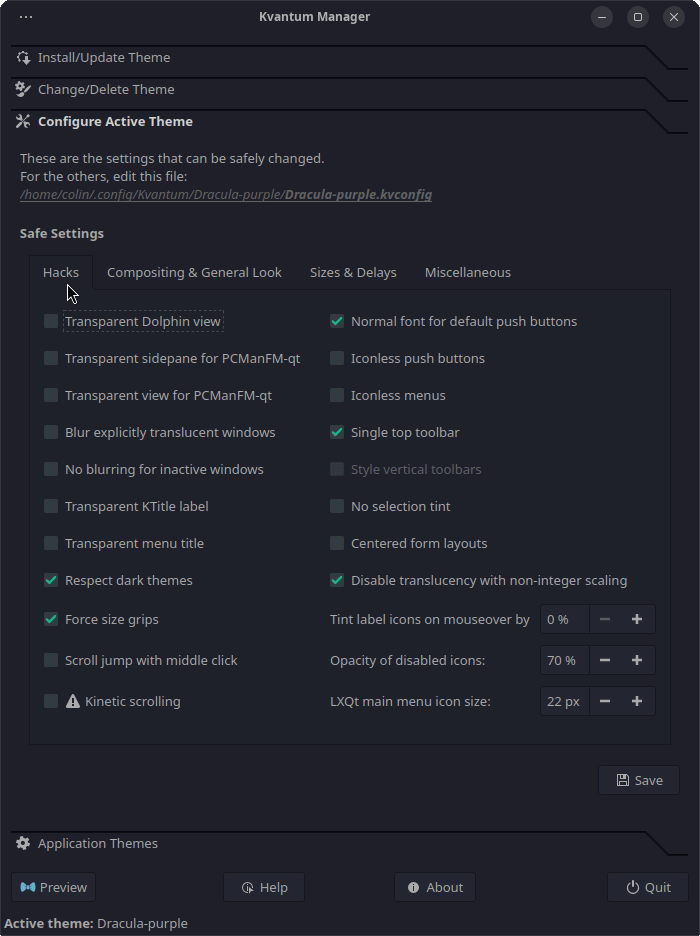
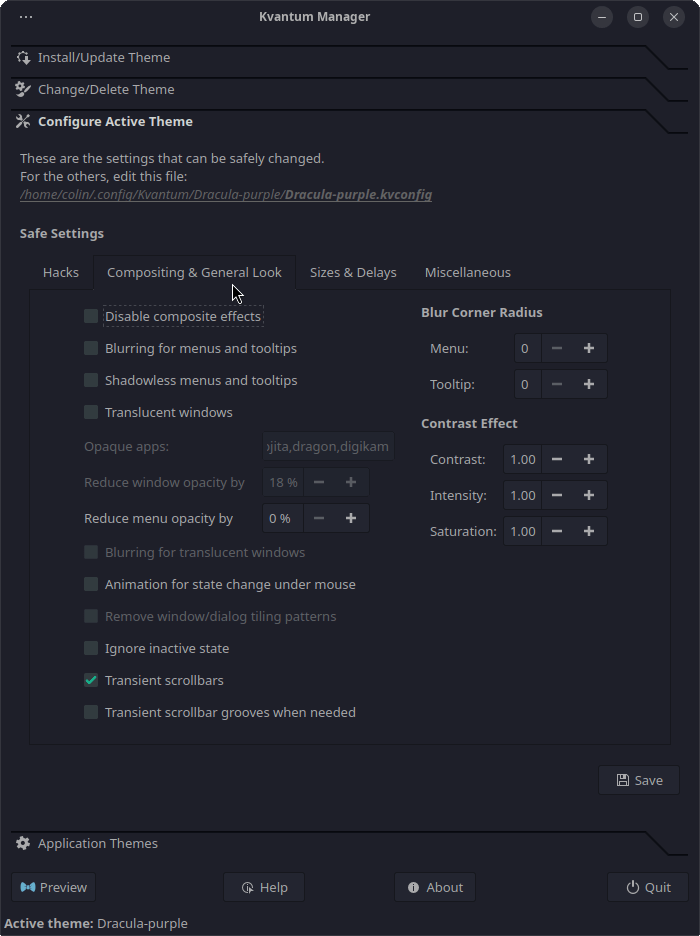
Then Configure Active Theme as shown in the following two screenshots…
To get the theme applied to the Garuda apps add QT_STYLE_OVERRIDE=kvantum to the bottom of /etc/environment.
Save the file and reboot.
Below is a screenshot of my desktop with Xfce, Gnome, KDE and Garuda software on it…
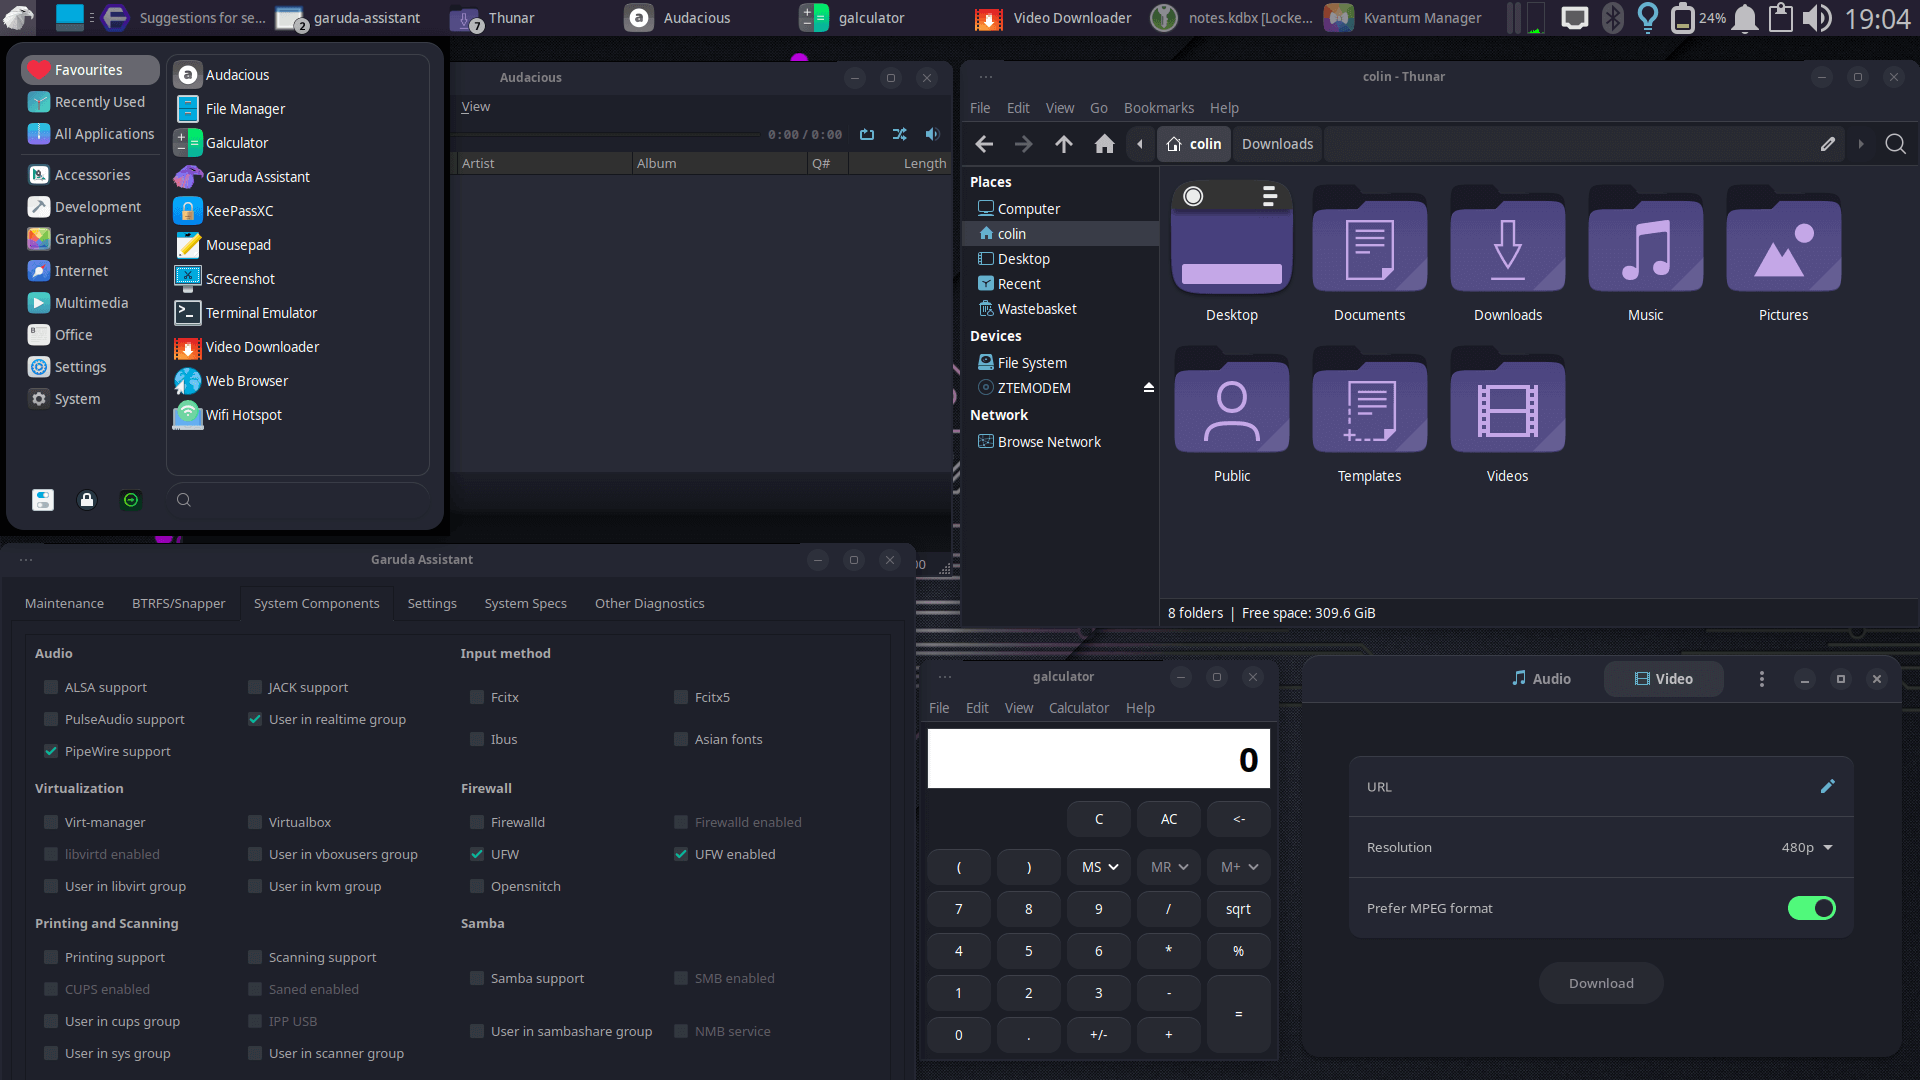
…everything now has a consistent theme.
You will notice in the above screenshot the panel has been moved to the top. This is because after many moons of using Gnome I got used to using a clipboard manager that was at the top of the screen. I tried to live with it at the bottom of the screen but I got totally racked off with initially going to the top of the screen to use the clipboard manager only to realize it wasn’t there and I had to go to the bottom of the screen to find it. In the end I relented and moved the panel to the top - here is how it’s done.
Right click on the panel and select Panel Preferences…
In Panel Preferences uncheck Lock panel…

…then place the mouse on the panel handle, click the left mouse button and drag the panel to the top of the screen…
![]()
…and when the panel is at the top of the screen lock it again using the aforementioned check box in Panel Preferences.
A few days after I’d put the panel at the top I found that I wasn’t keen on regularly using the whisker menu which was now accessed by the panel at the top of the screen. I then had the bright idea of using multiple panels to achieve what I wanted.
First up I decided to add an Ubuntu style panel on the left hand side of the screen. To create another panel go to Panel Preferences, click on the"+" sign and select Add a new panel…
To add launchers to the panel simply open the Whisker Menu, select an item, then right click on it and then select Add to Panel…
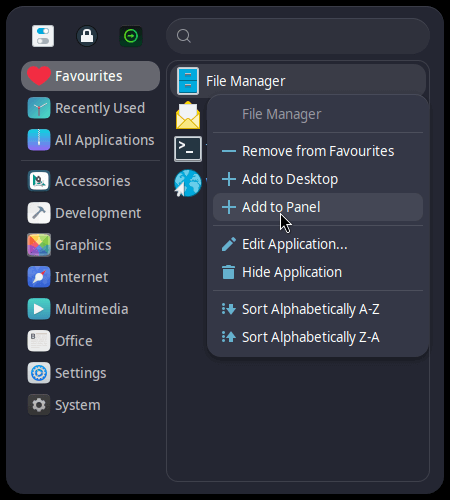
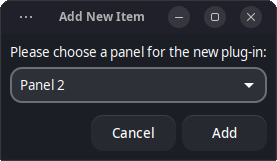
…the following Please choose a panel for the new plug-in will appear to which you select Panel 2…
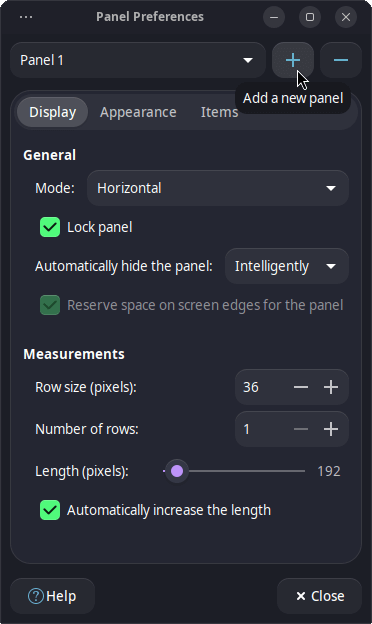
…you add all Whisker Menu items you use regularly to Panel 2 until you have all of the items you require for a “quick launch”. My panel is shown below along with its settings…
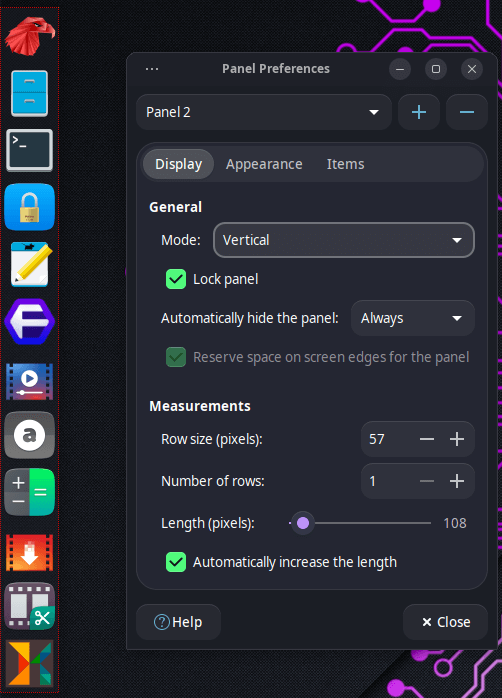
…note that the panel mode is set to Vertical and the panel is set to Automatically increase the length. Also, Automatically hide the panel is set to Always - this removes the panel from the desktop when it is not in use.
After I had set up the second panel as aforementioned I pondered redoing the main panel. As I was pondering I inadvertently deleted it by not taking notice of what I was doing. Fortunately the second panel I created allowed me to create more panels, so I proceeded to split my top panel into two separate panels - each one placed at either side of the desktop.
Here’s the first panel [left hand side] with its settings…
…note that Automatically hide the panel is set to Intelligently and Automatically increase the length is enabled. Below are the items in the panel:
Here’s the second panel [right hand side]. It has the same settings as the first panel. Below are the items in the panel:
Here are both of the panels as shown onscreen:
This looks fine, but I felt there should be a practical use for the space in the middle. After a bit of thinking the solution came to me.
The Xfce panel has a Workspace Switcher, but when it’s incorporated into a normal panel I find it practically useless because it’s too small. The space between the top two panels allows for a much larger Workspace Switcher to be placed on the desktop as shown below in Panel 4…
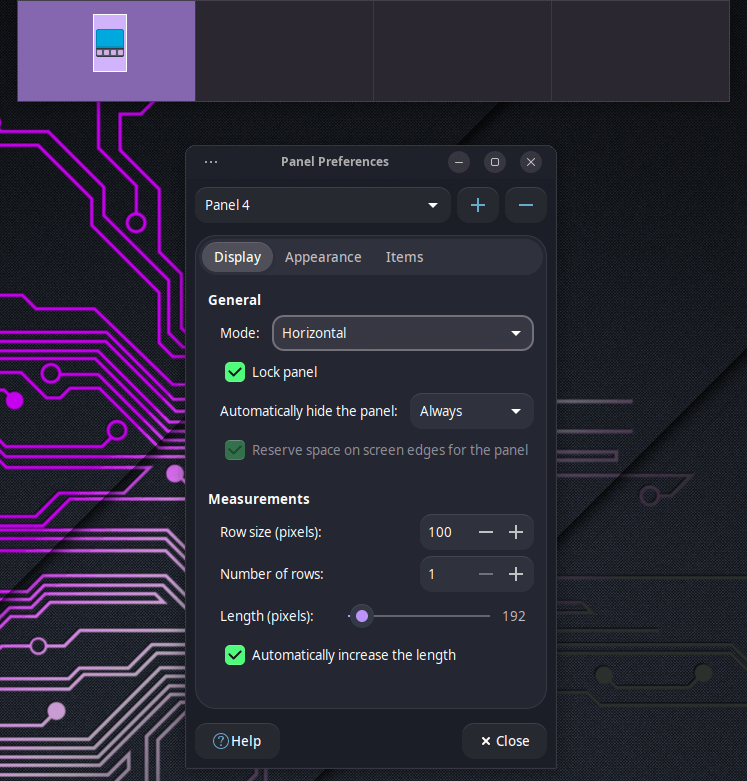
The Workspace Switcher panel is enlarged by increasing the Row Size:

Below is a screenshot of the desktop with all panels visible:

Pacman does not delete old or uninstalled packages automatically from the package cache, thus the cache can become very bloated with unnecessary files. This guide explains the issue and provides some solutions.
I chose to automatically clean package cache using the following method.
Using root Thunar navigate to /etc/pacman.d/hooks/ and create a New Empty File. Rename it clean_package_cache.hook.
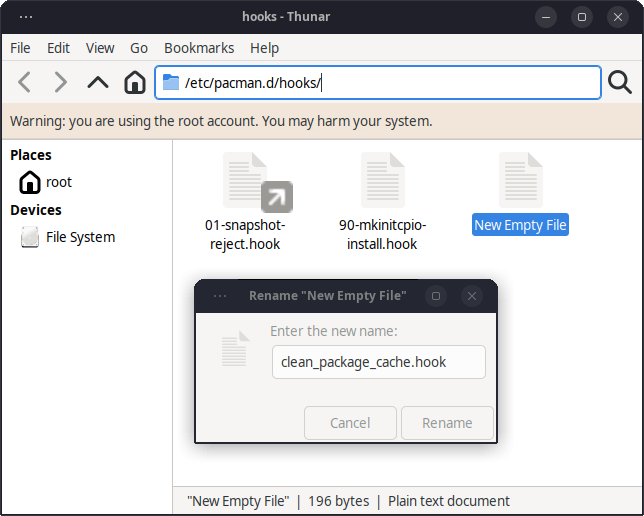
Then added the following lines:
[Trigger]
Operation = Upgrade
Operation = Install
Operation = Remove
Type = Package
Target = *
[Action]
Description = Cleaning pacman cache...
When = PostTransaction
Exec = /usr/bin/paccache -rk 1
This cleans all unused packages from the package cache except the most recent version when Pacman upgrades, installs, or removes software. It reduced the size of the package cache on my laptop from 3.2GB to 1.6GB on first use without compromising the functionality of the cache, and it now automatically keeps the cache at a sensible size.
The Xfce documents contain a useful tip about LCD hinting - it worked wonders for my old Lenovo laptop.
On some systems, LCD hinting results in better fonts. But because this is not working on all systems, this setting is not configurable through the interface. You can, however, set it with a simple query:
xfconf-query -c xsettings -p /Xft/Lcdfilter -n -t string -s lcddefault
Other possible values are lcdnone, lcddefault, lcdlight and lcdlegacy. You can check to see if the property is set properly by running xrdb -query in a terminal. To fully apply the LCD hinting, it is advisable to log out and in again (for restarting the X server).
![]()
Addendum
In August 2024 I had a look at the KDE desktop of Garuda shown on DistroWatch. I got to wondering if I could make the Xfce version more lightweight whilst paying homage to its big brother.
Here’s the KDE screenshot…

…and here’s what I came up with:

This is what I installed to make things work:
sudo pacman -S gnome-calendar
sudo pacman -S xfce4-docklike-plugin
sudo pacman -S inter-font
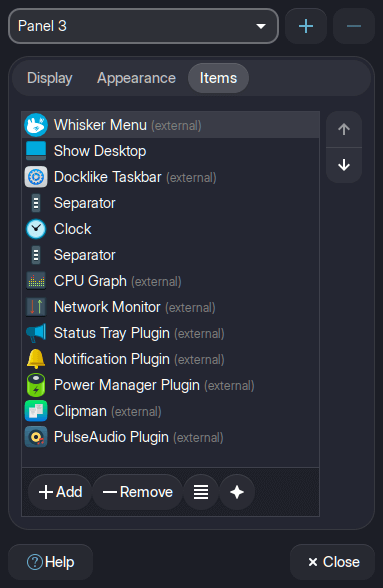
Unlike its big brother this version of Garuda only uses a single panel at the top of the screen, all other panels have been removed to minimize CPU use. The Docklike Taskbar allows frequently used programs to be pinned to the taskbar, thus the bottom panel is not required. Unnecessary junk in the top panel [e.g. numerous spacers and a second clock] has also been removed.
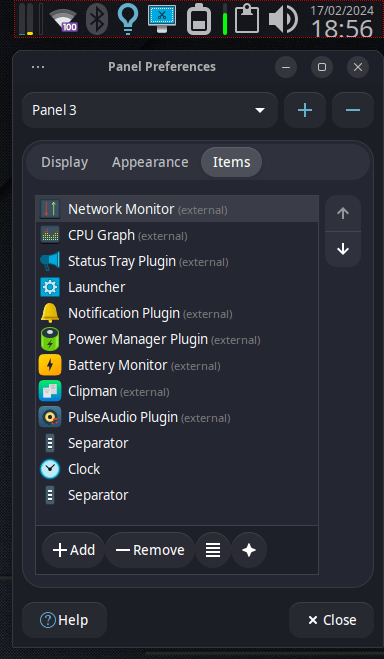
Below are the items used to give the panel its functionality [please ignore the panel number, it should be 1]:
Here are the main settings for the Whisker Menu:


The Clock settings are below:

The Calendar Command gnome-calendar displays the Gnome Calendar when the clock is single-clicked [it is way more useful than the default calendar]…

…and the Custom Format %R, %A %B %d, %Y formats the panel clock as following - Time, Day Month Date, Year. Also note that Inter Light has been used for the panel clock font.
Whilst I was digging around I found the following article…
…in all of the time I’ve been using Xfce I had no idea it had this feature was built in. The only problem I had with it is it doesn’t get on too well with Fastfetch, so Fastfetch was turned off. Note that the above article suggests setting F12 to open the terminal, this is not needed as it has a default setting of CTRL+ALT+T [but it can be changed if you so desire].
These are the Preferences settings I used [press CTRL+ALT+T to run the drop terminal, then right click the mouse on it and select Preferences]…
In the General tab turn off Run a custom command instead of my shell. This will turn off Fastfetch.
These are the terminal Drop-down settings I used [they can be modified to your liking]:

Finally, in Appearance I turned off Display menubar in new windows to prevent the menubar appearing at the top of the screen.
The end result:

The desktop wallpaper is a work of art by TilliDie
Below is a short video [no audio] showing how things are set up - simply pause the video as required to see the settings I used.

DT of the DistroTube YouTube channel prefers a light wallpaper when using a dark theme, so I gave this a try using more artwork from TilliDie. I also placed a Workspace Switcher at the bottom of the screen. I changed the colours of the switcher by creating a .CSS file in ~/.config/gtk-3.0 called gtk.css, and in that file I pasted the following:
  wnck-pager:selected {
    background-color: #272931; }
  wnck-pager:hover {
    background-color: #1f2029; }
I got the colours using Xfce’s Color Picker, and I set the Panel Preferences Opacity to 70 for both Enter and Leave. Here’s the resultant desktop:

Methinks DT is correct ![]()
Finally, Inter font makes a good default font.
To do this open the Whisker Menu and in the search box type in Appearance, and select it.
Here’s a screenshot showing the standard default font…

…and here’s a screenshot showing Inter as the standard default font:

Since we’re on the subject of Inter font @SGS suggested a different look for Galculator, so I changed the display colours…

…and changed the font to Inter Display Regular size 15…

…abd here’s the result:

As a footnote, following the changes made to the panel in the addendum along with the dark wallpaper and OS updates I found my OLED laptop took approx 5 hours to drain from 80% to 30%, which is quite a significant improvement on the previous 4 hours it took to drain by the same percentage. This means a 100% battery charge could now potentially give 10 hours of battery life ![]()
Thanks to the people who have helped me with my efforts in getting this sorted.
![]()