How to create Dolphin Service Menus (and other desktop files)


I have revised my old instructions for creating a Dolphin service menu, as the old tutorial was intended for KDE 5. The new instructions below are intended for creating a Dolphin service menu with KDE Plasma 6.

Feel free to add any Dolphin service menus of your own to this thread.


Dolphin Root Service Menu Copy + for KDE 6:

Garuda includes a Dolphin service menu to easily create a duplicate/backup copy of a file via the Dolphin right click context menu.

Unfortunately, the Dolphin service menu that is included by default with the Garuda KDE editions cannot be used to backup root files.

The Dolphin service menu file I’ve created below provides an easy right click context menu option to create versioned backups of any root file you wish to duplicate.

This Dolphin service menu item will duplicate any root file you right click on and append a timestamp and a .bak suffix to the files original name.

To enable this handy root backup method you simply need to create the required bak.desktop file in the new location that KDE Plasma 6 utilizes for Dolphin Service Menus.


Instructions:


Create the required directory/subdirectory for the service menu file:

mkdir -p ~/.local/share/kio/servicemenus

To open the Kate text editor and create the required bak.desktop file in the correct location, run in terminal:

kate -n /home/$USER/.local/share/kio/servicemenus/bak.desktop > /dev/null 2>&1 & disown

If you do not use the Kate text editor with KDE, then you can create the bak.desktop file in the correct location with the following command:

touch /home/$USER/.local/share/kio/servicemenus/bak.desktop

In your preferred text editor, paste the following contents into your newly created bak.desktop file:

[Desktop Entry]
Type=Service
ServiceTypes=KonqPopupMenu/Plugin
MimeType=all/all
Actions=bak;
X-KDE-Priority=TopLevel
X-KDE-StartupNotify=false
Icon=application-x-trash

[Desktop Action bak]
Name=Backup here (Root)
Icon=application-x-trash
Exec=pkexec cp -rf %f %f"$(date -Iminutes)".bak

Save the above bak.desktop file created using your text editor.

Then, make the desktop file executable:

chmod +x $HOME/.local/share/kio/servicemenus/bak.desktop

You may need to restart Dolphin for the service menu to become active, although I haven’t found this step necessary.

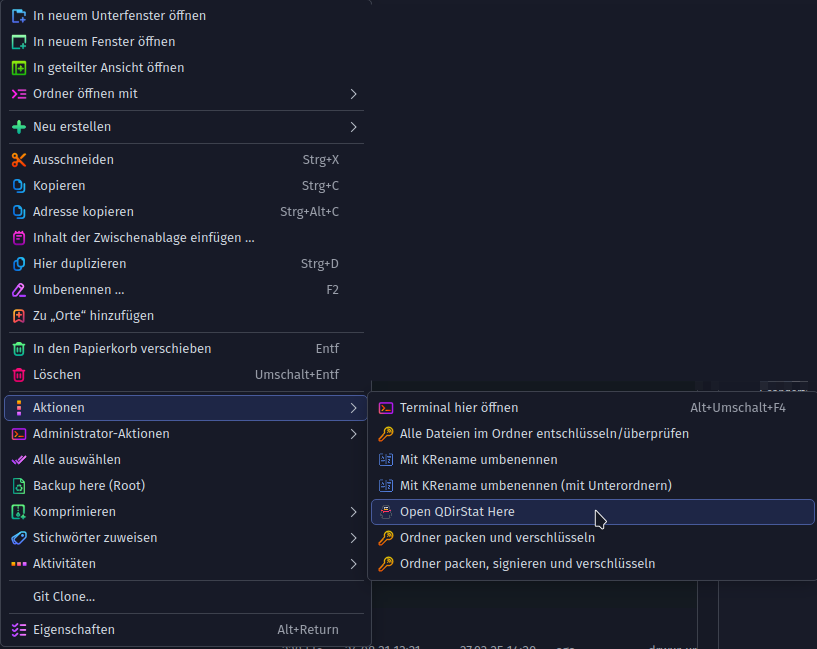
To create a timestamped backup copy simply right click on a root file in Dolphin and then select Backup here (root) .

Usage example:

Right click on /etc/fstab
Click on Backup here (root)
Enter your password in the prompt window.
This will create a new timestamped backup copy such as:

/etc/fstab2025-01-05T04:35-08:00.bak

You may need to press F5 to refresh Dolphin’s view for the newly created timestamped backup file to become visible. Although it shows up immediately on my system once duplicated.


14 Likes

Wow, nice one! It works great, you can grab a whole directory path too!

2 Likes

Right on. :nerd_face: :ninja: --- Good one @tbg

This Post is also a good place to learn about creating *.desktop files in general. Maybe put the word .desktop or some such in the OP Title to make it readily searchable. Or... actually this would be a great topic for a FAQ/Guide/HOWTO.

I'll search the forum to check if any Guide to Creating Desktop [ *.desktop ] files already exists before I move forward.

-Enjoy :coffee:
Cannabis

3 Likes

Just FYI:

I originally wrote the tutorial on my opening post of this thread several years back. I have revised my old instructions for creating a Dolphin service menu, as the original tutorial was written for KDE 5. I have revised the instructions on my opening post to reflect the changes required to be compatible with KDE Plasma 6.

I hope that some users still find this service helpful.

5 Likes


The select-all Dolphin service menu adds a right click context menu entry that enables selecting all files within the currently active tab.

I’ve long considered it a drastic oversight on KDE’s part for not including this feature by default in their Dolphin file manager.

Fortunately, you can easily write your own service menu to enable this handy feature.

The select-all Dolphin service menu below was written by Christian Hartmann, see his github page:


Instructions:


To enable the Dolphin Select-All service menu, you simply need to create the ~/.local/share/kio/servicemenus/select-all-dbus.desktop file and be sure to make it executable.

Firstly, you will need to create the required directory/subdirectory for KDE Plasma 6 service menu desktop files, execute:

mkdir -p ~/.local/share/kio/servicemenus

To create the select-all-dbus.desktop file in the appropriate location with the Kate KDE text editor run the command below:

kate -n /home/$USER/.local/share/kio/servicemenus/select-all-dbus.desktop > /dev/null 2>&1 & disown

If you do not use the Kate text editor with KDE, then you can create the select-all-dbus.desktop file in the correct location with the following command:

touch /home/$USER/.local/share/kio/servicemenus/select-all-dbus.desktop

Then, in your preferred text editor, copy and paste the contents from the code block below into the newly created select-all-dbus.desktop file.

#
#	select-all-dbus.desktop Version 0.0.1
#	Copyright (C) 2024 Christian Hartmann <hartmann.christian@gmail.com>
#
#	SPDX-FileCopyrightText: 2022 Christian Hartmann <hartmann.christian@gmail.com>
#
#	SPDX-License-Identifier: LicenseRef-KDE-Accepted-GPL
#
#	This program is free software; you can redistribute it and/or
#	modify it under the terms of the GNU General Public License as
#	published by the Free Software Foundation; either version 3 of
#	the license or (at your option) at any later version that is
#	accepted by the membership of KDE e.V. (or its successor
#	approved by the membership of KDE e.V.), which shall act as a
#	proxy as defined in Section 14 of version 3 of the license.
#
#	This program is distributed in the hope that it will be useful,
#	but WITHOUT ANY WARRANTY; without even the implied warranty of
#	MERCHANTABILITY or FITNESS FOR A PARTICULAR PURPOSE. See the
#	GNU General Public License for more details.
#
# TODO: match remote directories. text/x-uri is not sufficient
#       X-KDE-Protocol?
#       https://develop.kde.org/docs/apps/dolphin/service-menus/#advanced-properties

[Desktop Entry]
Name=Select All
Type=Service
MimeType=inode/directory;inode/mount-point;inode/*;
X-KDE-ServiceTypes=KonqPopupMenu/Plugin
X-KDE-Priority=TopLevel
Icon=edit-select-all-symbolic
InitialPreference=60
Actions=SelectAll;
TryExec=qdbus

[Desktop Action SelectAll]
Icon=edit-select-all-symbolic
Name=Select All
Name[ar]=حدد الكل
Name[bn]=সব নির্বাচন করুন
Name[cs]=Vyberte vše
Name[da]=Vælg alle
Name[de]=Alle auswählen
Name[el]=Επιλέξτε όλα
Name[es]=Seleccionar todo
Name[fa]=همه را انتخاب کنید
Name[fi]=Valitse kaikki
Name[fr]=Sélectionner tout
Name[hi]=सबका चयन करें
Name[hu]=Válassza ki az összeset
Name[id]=Pilih semua
Name[it]=Seleziona tutto
Name[ja]=すべて選択
Name[jv]=Pilih kabeh
Name[ko]=모두 선택
Name[nl]=Selecteer alles
Name[no]=Velg alle
Name[pl]=Zaznacz wszystko
Name[pt]=Selecionar tudo
Name[ru]=Выбрать все
Name[sv]=Välj alla
Name[tr]=Tümünü seç
Name[ur]=سبھی کو منتخب کریں۔
Name[vi]=Chọn tất cả
Name[zh]=选择全部
Exec=bash -c 'for sname in $( qdbus "org.kde.dolphin-*" ) ; do isactive=false ; isactive=$( qdbus "$sname" "/dolphin/Dolphin_1" "org.qtproject.Qt.QWidget.isActiveWindow" ) ; $isactive && qdbus "$sname" "/dolphin/Dolphin_1/actions/edit_select_all" "org.qtproject.Qt.QAction.trigger" ; done'


After pasting the above contents into the ~/.local/share/kio/servicemenus/select-all-dbus.desktop file, save the file with your text editor.

Then, you need to make the desktop file executable by running the command below:

chmod +x $HOME/.local/share/kio/servicemenus/select-all-dbus.desktop

After completing the above procedure you may need to restart Dolphin for the newly created service menu option to become active.


Feel free to add your own favorite Dolphin service menu here as well. :+1:

5 Likes

Very useful feature, thanks for it.
The possibilities under Linux are nearly endless.

2 Likes

Just for fun. :smiley:

You can create a custom desktop file to unmount a USB drive without the need for elevated permissions.

You might ask why? when most every GUI file manager has the option to “safely remove” a USB drive if you want it deactivated.

The reason being, is that using the “safely remove” option in a GUI file manager doesn’t allow for remounting the drive if you wish to access it again. You must physically unplug the drive and then reinsert it back into a USB port before it can be accessed again. This can be very annoying if you decide you want to access the drive again and the USB port is in a not so accessible location.

I have an external USB hard drive that I use for backup that I copy data to which I want unloaded from the USB bus when not in use. This is for an added level of safety to ensure it isn’t messed with by my not so computer savvy GF. She has the nasty habit of mistakenly moving or deleting stuff she shouldn’t sometimes. Keeping my backup drive unmounted most of the time also lessens the likelihood of the drive being damaged during a power outage IMO. Yet, I still want to be able to access this drive without a bunch of rigamarole like having to issue commands requiring sudo/root permissions. This simply makes life easier by not needing to unmount this drive via the terminal, so that I can easily access it again.

The desktop file below can be placed in any convenient location like your applications menu, taskbar, or on your desktop to provide an easy one click method to unmount any drive you choose.

Directions:

Create a file named unmount.desktop with your text editor.

Note:

You must modify the line Exec=/usr/bin/udisksctl unmount -b /dev/sdd1 in the unmount.desktop file to reflect the drive you wish to unmount.

The desktop file should have the following contents:

[Desktop Entry]
Categories=System;Utility;
Comment[en_CA]=Rootless unmount
Comment=Rootless unmount
Encoding=UTF-8
Exec=/usr/bin/udisksctl unmount -b /dev/sdd1
GenericName[en_CA]=Unmount Drive
GenericName=Unmount Drive
Icon=emblem-unmounted
Keywords=System;KDE;
MimeType=
Name[en_CA]=Unmount Drive
Name=Unmount Drive
NoDisplay=true
Path=
StartupNotify=false
Terminal=false
TerminalOptions=
Type=Application
Version=1.0
X-DBUS-ServiceName=
X-DBUS-StartupType=

You will likely need to replace /dev/sdd1 in your desktop file with your actual drive assignment.

You can find your drive information that you may need to substitute for /dev/sdd1 with the following command:

sudo blkid -o list

After you’ve finished editing your unmount.desktop file, save it, and then place it wherever you’d prefer to launch it from.

You can place the desktop file in your applications menu (~/.local/share/applications), your taskbar, or on your desktop.

Be sure to make your newly created unmount.desktop file executable.

I just thought I’d post this in case anyone is interested. Even if you never need the desktop file, learning about the udisksctl command may come in extremely handy if you weren’t aware of it. Using theudisksctl command instead of mount and umount is far easier and more versatile as it doesn’t require root privileges if scripting things.

Cheers.


7 Likes

In the same vein as my last post, I thought I’d post a desktop file and script that can make accessible a USB drive that the “Safely Remove” feature has made inaccessible. The script below will re-initialize all devices connected via USB, such as hard drives, flash drives, printers, etc. The script can also be utilized to wake up a sleeping USB device that did not revive correctly after suspend or hibernation. This can be super useful if the device happens to be a sleeping USB mouse or keyboard that prevents you from using your computer.

Do not invoke the script if activity is taking place with any device connected via USB. The script will disconnect USB devices momentarily from the USB bus before reactivating them. This may cause a temporary internet disconnection if any USB WiFi adapters or USB phone tethering is in use.

If having this option available interests you follow my directions below:

To re-detect/re-initialize all devices connected to the USB bus you will need to write a script.

Create the file that will contain the script with the following command:

sudo touch /usr/local/sbin/usb_restart.sh

Open the /usr/local/sbin/usb_restart.sh file with your preferred text editor.

Copy and paste the contents below into the /usr/local/sbin/usb_restart.sh script file:

#!/bin/bash
#reset all of USB1/2/3 ports
#cat /usr/local/sbin/usb_restart.sh
for i in /sys/bus/pci/drivers/[uoex]hci_hcd/*:*; do
  [ -e "$i" ] || continue
  echo "${i##*/}" > "${i%/*}/unbind"
  echo "${i##*/}" > "${i%/*}/bind"
done

Save your newly created script, and then exit your text editor.

To create and save, and make the script executable, and launch the script requires sudo or root privileges .

To make your script executable issue the following command:

sudo chmod +x  /usr/local/sbin/usb_restart.sh

The script can be launched from either the terminal or with a desktop file. It is handy to have both options in case your USB mouse or keyboard becomes inactive.


Directions for creating the desktop file to invoke the script:

Elevated privileges are not required to create the desktop file, but you will need to enter your sudo password to launch the script with the desktop file.

Create a file named usb-reset.desktop.

Copy and paste the following contents into your newly created usb-reset.desktop file with your text editor:

[Desktop Entry]
Categories=System;Utility;
Comment[en_CA]=Restart USB Bus
Comment=Restart USB Bus
Encoding=UTF-8
Exec=pkexec /usr/local/sbin/usb_restart.sh
GenericName[en_CA]=Restart USB Bus
GenericName=Restart USB Bus
Icon=drive-removable-media-usb
Keywords=system;utility;
MimeType=
Name[en_CA]=USB Restart
Name=USB Restart
NoDisplay=true
Path=
StartupNotify=false
Terminal=false
TerminalOptions=
Type=Application
Version=1.0
X-DBUS-ServiceName=
X-DBUS-StartupType=

After saving the desktop file, be sure to make the file executable.

After creating the desktop file, it can be placed in any convenient location to launch the script. You can use your applications start menu, your taskbar, or place it on your desktop to provide an easy one click method to reinitialize all your USB devices. It may also be a good idea to create a bash alias to execute the script in case your mouse doesn’t wake after suspension/hibernation. In this type of situation the desktop file is hard to access if your mouse is asleep, so the keyboard and terminal will save the day. :smiley:

Just FYI, you can change the desktop file’s icon and substitute any other system icon that you’d prefer. To change the desktop file’s icon in KDE right click on the desktop file and select “properties” in the context menu. In the dialog window that opens, click on the icon image (top left side). This will open a dialog window with many icons to choose from. Click on any icon you like there and it will become your desktop file’s new icon. Alternately, you can directly edit the desktop file’s Icon= line to change the icon manually.

Some icon choices you may like substitute in the desktop file are listed below:

Icon=package-reinstall
Icon=btsync-gui
Icon=curve-connector
Icon=draw-connector
Icon=exchange-positions-symbolic
Icon=gtk-disconnect
Icon=media-repeat-none
Icon=offline
Icon=reverse


I just thought I’d provide further examples for those unfamiliar with creating desktop files. Hopefully someone finds this information useful.

4 Likes

Below is a Dolphin service menu I’ve written for the QDirStat program.

QDirStat is a graphical QT application that shows how your disk space is allocated. I much prefer using QDirStat to the ducommand, or other graphical disk usage apps such as KDE’s Filelight.

Filelight:

I simply don’t like Filelight’s pie graph visual display method for drive statistics, (as it’s just too non-linear for me).

I much prefer the way QDirStat displays usage statistics.

QDirStat:

The only thing I don’t like about the QDirStat program is that it is cumbersome to quickly launch and browse to a deeply nested folder location. The service menu below will open the QDirStat program in the current Dolphin directory via the right context menu .

At first glance this appears to be a a deceptively simple Dolphin service menu. However, I can assure you it was not so simple to get this service menu working. Every other service menu launch method I tried failed miserably. I tested likely 50 different service menu versions before I managed to find one that actually opened QDirStat in Dolphin’s current directory. Every other launch method I attempted either wouldn’t open QDirStat correctly, or opened QDirStat in Dolphin’s parent directory, (not the current working directory of Dolphin).

Open QDirStat Here - Dolphin Service Menu:

[Desktop Action startqdirstat]
Exec=/usr/bin/ bash -c ''"$PWD" | qdirstat''
Icon=im-qq
Name=Open QDirStat Here

[Desktop Entry]
Actions=startqdirstat
Icon=im-qq
MimeType=inode/directory;inode/mount-point;inode/*;
ServiceTypes=KonqPopupMenu/Plugin
Type=Service

I hope someone who also uses QDirStat finds this Dolphin service menu useful.

5 Likes

Thanks for sharing :slight_smile:
I follow your guide and need a little to find it in the menu :smiley:

2 Likes